In order to use datamatrix barcodes the module
"datamatrix/datamatrix.inc.php" must first be included.
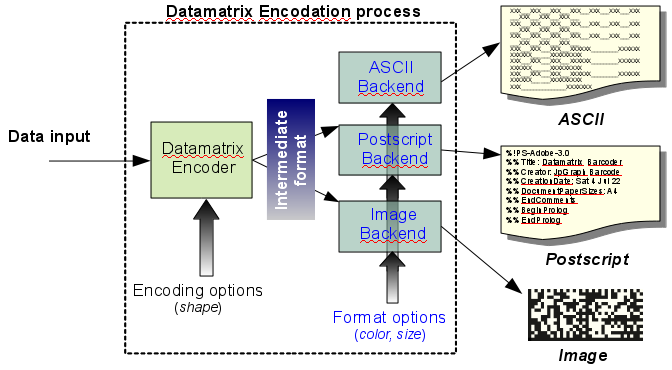
Usage of Datamatrix barcodes follows a similar schema as for the linear and PDF417 barcodes with concepts of an encoder and backend. The principle of the overall encodation process is shown in Figure 26.4
Assuming that the library is installed where it can be found by PHP it is now very simple to create a basic Data Matrix symbol using just default values. We first show the complete first example and then discuss it. In the following scripts we will assume that the include path has the core JpGraph directory in its path.
All barcode creation follows the following basic three steps :
Create an instance of the encoder with the chosen datamatrix layout as an instance of
class DatamatrixCreate an instance of a suitable backend for the chosen output format (image or postscript) by calling the
DatamatrixBackenFactory::Create()Encode data and send it back to the browser or to a file with a call to the backend
Backend::Stroke()method.
The following script shows how to create the simplest possible barcode (in PNG
format) representing the data string "The first datamatrix" encoded
using all default values. The resulting barcode is shown in Figure 26.5
Example 26.1. The simplest possible datamatrix script (datamatrix_ex00.php)
1 2 3 4 5 6 7 8 9 | // content="text/plain; charset=utf-8" require_once('jpgraph/datamatrix/datamatrix.inc.php'); $data = 'The first datamatrix'; $encoder = DatamatrixFactory::Create(); $backend = DatamatrixBackendFactory::Create($encoder); $backend->Stroke($data); |

(As can be seen this follows the same principles as the creation of PDF417 symbols)
The principle is the same for all type of data matrix symbol creations. We first
create an instance of the chosen encoder. In this case a standard ECC-200 encoder by
creating an instance of class Datamatrix. We then create a suitable
backend that handles the output of the barcode. By default the output will be an
image encoded in the PNG image format.
The final step is to send back the generated image to the browser with a call to
the method Backend::Stroke() with the data to be encoded as its first
argument.
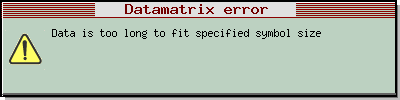
The example above does not have any error handling. If there is some error in the process an exception will be thrown in the same way as in other places in the library. The default exception will display a standard library image error box. An example of this is shown in Figure 26.6.
If some additional processing is necessary and just display a text based re-formatted error message we could change the above code to catch this exception as the following example shows.
Example 26.2. Datamatrix with basic error handling (datamatrix_ex0.php)
1 2 3 4 5 6 7 8 9 10 11 12 13 14 15 16 17 18 | // content="text/plain; charset=utf-8" require_once('jpgraph/datamatrix/datamatrix.inc.php'); $data = 'The first datamatrix'; $encoder = DatamatrixFactory::Create(); $encoder->SetEncoding(ENCODING_ASCII); $backend = DatamatrixBackendFactory::Create($encoder); // We increase the module width to 3 pixels $backend->SetModuleWidth(3); try { $backend->Stroke($data); } catch (Exception $e) { echo 'Datamatrix error: '.$e->GetMessage()."\n"; exit(1); } |

In contrast to the PDF417 encodation process there is no option to select an level
of error correction. The error correction level is automatically specified in the
standard depending on the size of the barcode. As a final initial example the next
script uses the backend method Backend::SetModuleWidth($aWidth) to
increase the width of one module.
Example 26.3. Datamatrix with modified module width (datamatrix_ex1.php)
1 2 3 4 5 6 7 8 9 10 11 12 13 14 15 16 17 18 | // content="text/plain; charset=utf-8" require_once('jpgraph/datamatrix/datamatrix.inc.php'); $data = '123456'; $encoder = DatamatrixFactory::Create(); $backend = DatamatrixBackendFactory::Create($encoder); $backend->SetModuleWidth(3); // Create the barcode from the given data string and write to output file try { $backend->Stroke($data); } catch (Exception $e) { $errstr = $e->GetMessage(); echo "Datamatrix error message: $errstr\n"; } |

As in other parts of the library the Datamatrix module throws an exception when an
error occurs. As shown in the previous section an error image is the default if no
explicit try {} catch {} statement is added to the script.
The script below shows how to catch the error, do some possible clean up and then explicitly create and send back the error image.
1 2 3 4 5 6 7 8 9 10 | ... try { $backend->Stroke($data); } catch( Exception $e ) { doCleanup(); $errobj = new DMErrObjectImg(); $errobj->Raise($e->getMessage()); } |
another variant of this would be to re-throw the exception after the cleanup has been performed as the following example shows
1 2 3 4 5 6 7 8 9 | ... try { $backend->Stroke($data); } catch( Exception $e ) { doCleanup(); throw $e; } |
It is also possible to get hold of the internal error code that corresponds to
each error message by calling the PHP standard exception method
Exception::getCode() as the following example shows
1 2 3 4 5 6 7 8 9 10 | ... try { $backend->Stroke($data); } catch (Exception $e) { $errstr = $e->GetMessage(); $errcode = $e->GetCode(); echo "Datamatrix error ($errcode). Message: $errstr\n"; } |
Table 26.3 lists the errors that can be thrown by the datamatrix module (the table deliberately excludes internal error messages).
Table 26.3. Datamatrix error messages
| Error number | Error messages |
|---|---|
| -1 | Data is too long to fit specified symbol size |
| -2 | The BASE256 data is too long to fit available symbol size |
| -3 | Data must have at least three characters for C40 encodation |
| -4 | Data must have at least three characters for TEXT encodation |
| -8 | The given data can not be encoded using X12 encodation. |
| -9 | The "tilde" encoded data is not valid. |
| -10 | Data must have at least three characters for X12 encodation |
| -11 | Specified data can not be encoded with datamatrix 000 140 |
| -12 | Can not create image |
| -13 | Invalid color specification |
| -15 | This PHP installation does not support the chosen image encoding format |
| -20 | The specification for shape of matrix is out of bounds (0,29) |
| -21 | Cannot open the data file specifying bit placement for Datamatrix 200 |
| -22 | Datafile for bit placement is corrupt, crc checks fails. |
| -26 | Cannot open the data file specifying bit placement for Datamatrix 140 |
| -30 | The symbol size specified for ECC140 type Datamatrix is not valid |
| -31 | Data is too long to fit into any available matrix size for datamatrix 140 |
| -34 | Cannot open file %s for writing. |
| -35 | Cannot write to file %s . |
| -99 | EDIFACT encodation not implemented |
| -100 |
Datamatrix Error: HTTP headers have already been sent. Caused by output from file %s at line %d Explanation: HTTP headers have already been sent back to the browser indicating the data as text before the library got a chance to send it's image HTTP header to this browser. This makes it impossible for the Datamatrix library to send back image data to the browser (since that would be interpretated as text by the browser and show up as junk text). Most likely you have some text in your script before the call to DatamatrixBackend::Stroke(). If this texts gets sent back to the browser the browser will assume that all data is plain text. Look for any text (even spaces and newlines) that might have been sent back to the browser. For example it is a common mistake to leave a blank line before the opening "<?php" |
The primary encodation option is to manually specify the shape of the Datamatrix barcode. By default the symbol size will be chosen as the smallest possible. However some application require that usage of a fixed size symbol shape.
The available shapes are listed in Table 26.2. The wanted shape is specified when
the instance of the encoder is created or by a call to
Datamatrix::SetSize(). The shape is specified by a symbolic
constant that corresponds to each available shape in Table 26.2. The symbol name is
"DMAT_<H>x<W>" where <H> is the height (in
modules) and <W> is the width (in modules). For example the
following line specifies a 24 module square symbol
1 | $encoder->SetSize(DMAT_24x24); |
In addition to the sizes specified in Table 26.2 there is also an option to specify automatic sizing (which is the default). The following script sets the sizing to be automatic.
1 | $encoder->SetSize(DMAT_AUTO); |
As was discussed in Section 26.1.5 there are several ways by which data can be encoded. By default the encoder will use an optimal algorithm to create a combination of the available encodation schema to create the smallest possible symbol. In some application it might however be stated that a specific encodation method should be chosen.
The encoding method is a property of the encodation class and is set with a call to
Datamatrix::SetEncoding($aEncoding=ENCODING_ASCII)
The encoding is specified as one of the symbolic constants shown in Table 26.4
Table 26.4. Datamatrix encodation schemas
| Symbolic constant | Encoding schema | Character set |
|---|---|---|
| ENCODING_AUTO | -- | An optimal combination of all encodation schema |
| ENCODING_ASCII | ASCII | Most efficient for numeric data |
| ENCODING_C40 | C40 | Primarily upper-case alphanumeric |
| ENCODING_TEXT | Text | Primarily lower-case alphanumeric |
| ENCODING_X12 | X12 | ANSI X12 EDI data set |
| ENCODING_EDIFACT | EDIFACT | ASCII values 32-94 |
| ENCODING_BASE256 | Base 256 | All byte values 0-255 |
The following example sets the ASCII encodation schema
1 | $encoder->SetEncoding(ENCODING_ASCII); |
The default automatic encoding is the same as
1 | $encoder->SetSize(ENCODING_AUTO); |
In order to allow the specification of special input data in normal ASCII encodation for easy entering from a keyboard the library supports what is commonly known as "tilde" processing. When this is enabled (it is disabled by default) certain character sequences that begins with a tilde sign (i.e. "~") will be translated to a special ASCII value that cannot normally be entered from a keyboard.
When tilde mode is enabled with a call to the method
Datamatrix::SetTilde($aFlg=true)
Table 26.5 lists the translations that will then be enabled on the input data. Some of the translations are technical and requires full understanding of Datamatrix standard to be used.
Table 26.5. Tilde processing translating
| Input sequence | Translation |
|---|---|
| ~X : where 'X' is a character in the range [@-Z] | Translates to ASCII value 0-25, i.e. ~@==0, ~A==1, ~B==2 , ... |
| ~1 | Represents the character FNC1. Alternate Data Type Identifier. See Table 6: ISO 16022 |
| ~2nnmmfffggg |
Structured Append. This code is only allowed in the first position of the data. Up to 16 ECC 200 symbols may be appended in a structured format. The structured append is specified with symbol index, total number of symbols and a file identification. The first two values "nn" is the position of this particular symbol specified as two digits in the range of 01-16. The second two values "mm" is the total number of symbols in this structured append in the range 02-16 specified as two digits. The last two 3 digit codewords are the file identification specified with digits and necessary leading 0:s to make it a full three digits. For example. Assume that we want to encode the 4:th symbol from a total of 9 symbols and with the file identification "0,1". This would then be encoded as "~20409000001". Note: Internally this is translated to three codewords with the reserved starting codeword of ASCII 233. |
| ~5 and ~6 |
The special 05 and 06 Macros. Can only be in the first position and is used to encode industry standard headers in certain structured formats. Macro 05 is translated by the barcode reader to : Symbol prefix: chr(30) chr(05) chr(29) Symbol postfix: chr(30) chr(04) Macro 06 is translated by the barcode reader to : Symbol prefix: chr(30) chr(06) chr(29 Symbol postfix: chr(30) chr(04) |
| ~7nnnnnn |
Extended Channel Interpretation (ECI) nnnnnn. The ECI protocol allows the output data stream to have interpretations different from that of the default character set. See "Extended Channel Interpretation Assignments" document (available from ISO) for a list of channels and there meaning. The ECI is identified by a 6-digit number which is encoded according to Table 10: in the ISO 16022:2000 specification. This is the encodation that is used for the "~7" tilde specification of the ECI protocol. |
| ~9 |
Send the special control code (ASCII=234) so that the reader will interpret the rest of the symbol as a bar code reader programming instruction. |
| ~dnnn |
Character value as 3 digits, i.e. ~d142 means ASCII value 142 |
In order to create the actual output one or more backends must be created. The Datamatrix supports the following backends:
BACKEND_IMAGE, Create an image backend. This is the default backend if no explicit backend is specified.BACKEND_PS, Create a postscript backend. The text string that represents the postscript for the barcode is returned directly from theBackend::Stroke()BACKEND_EPS, Create an encapsulated postscript backendBACKEND_ASCII, This is a special backend which will generate an ASCII rendering of the datamatrix barcode. This is mostly practical for technical investigations regarding the technical structure of a Datamatrix barcode.
The following code snippet shows two ways of creating a barcode image backend.
1 2 | // Create an image backend
$backend = DatamatrixBackendFactory::Create($encoder); |
1 2 | // Create an image backend
$backend = DatamatrixBackendFactory::Create($encoder, BACKEND_IMAGE); |
The following code shows a complete script to generate a postscript output
1 2 3 4 5 6 7 8 9 10 11 12 13 14 15 16 17 | require_once('jpgraph/datamatrix/datamatrix.inc.php'); $data = '0123456789'; // Create and set parameters for the encoder $encoder = DatamatrixFactory::Create(); // Create the image backend (default) $backend = DatamatrixBackendFactory::Create($encoder, BACKEND_PS); try { $ps_txt = $backend->Stroke($data); echo '<pre>'.$ps_txt.'</pre>'; } catch (Exception $e) { $errstr = $e->GetMessage(); echo "Datamatrix error message: $errstr\n"; } |
The following methods are available to adjust the final look and feel of the barcode
Backend::SetColor($aOne, $aZero,
                            $aBackground='white')
the color of the 'black' and 'white' modules in the barcode and the quiet area around the barcode
Backend::SetQuietZone($aSize)the size of the "quiet zone" in pixels for the image backend and in points (1 pt = 1/72 inch) for the postscript backend
Backend::SetModuleWidth($aWidth)the module width specified in pixels for the image backend and in points (1 pt = 1/72 inch) for the postscript backend
Backend::Stroke($aData, $aFileName='')create the barcode and send it back the client or store it to a file if the second parameter is set. For postscript backends the postscript string is returned directly from the method. (See example above)
For the image backend it is possible to adjust the image encoding format with the following method
Backend::SetImgFormat($aFormat,$aQuality=75)Specify image format. Possible values are
'auto''png''jpeg''gif'
For 'jpeg' format the quality parameter is a number in range [1-100] and specified how much compression / (Data loss) should be used. 100=no compression. Normal values are in the range [60-95]
The following example sets the image format to 'JPEG' with quality 80.
1
$backend->SetImgFormat('jpeg', 80);
For postscript backend it is possible to select whether the postscript should be generated as encapsulated postscript. This is controlled by the method
Backend::SetEPS($aFlg=true)
In the example directory in the distribution
('datamatrix/examples') you can find many more examples on
how to create barcodes. As a good start the following (simple) template may be used
as a base for further customizations.
1 2 3 4 5 6 7 8 9 10 11 12 13 14 15 16 17 18 19 20 21 22 23 24 25 26 27 28 29 30 31 32 33 34 35 36 37 38 | require_once('jpgraph/datamatrix/datamatrix.inc.php'); $data = '0123456789'; $shape = DMAT_AUTO; $encoding = ENCODING_AUTO; $modulewidth = 3; $quietzone = 10; $color1 = 'black'; $color0 = 'white'; $colorq = 'white'; $outputfile = ''; // Create and set parameters for the encoder $encoder = DatamatrixFactory::Create($shape); $encoder->SetEncoding($encoding); // Create the image backend (default) $backend = DatamatrixBackendFactory::Create($encoder); // By default the module width is 2 pixel so we increase it a bit $backend->SetModuleWidth($modulewidth); // Set Quiet zone $backend->SetQuietZone($quietzone); // Set other than default colors (one, zero, quiet zone/background) $backend->SetColor($color1, $color0, $colorq); // Create the barcode from the given data string and write to output file try { $backend->Stroke($data,$outputfile); } catch (Exception $e) { $errstr = $e->GetMessage(); echo "Datamatrix error message: $errstr\n"; } |
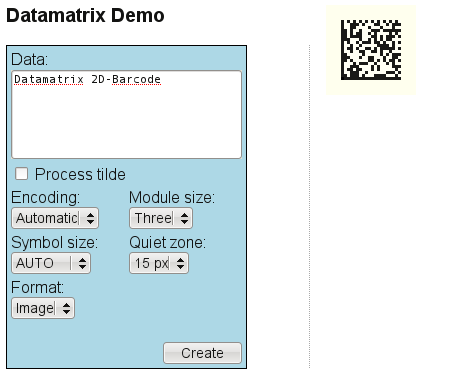
As an example the library includes a WEB-based demo barcode creation application.
This application can be used to easily create barcode through it's WEB interface. It
is available at 'datamatrix/demoapp/index.html'
This application is primarily included as a demo on the features available in the library and not as a finalized product.
Figure 26.9 shows a screen shot of the application interface.